Microsoft Dynamics CRM doesn’t support multi-select option sets out of the box, but due to som trickey work with JavaScript we can handle this event.
Just have a look on following steps:
Step 1: Create a new OptionSet field. I have used the name "sports".
 Step 2: Create a new Multi-Select Text field. I have used the name "serviceinterest_value".
 Step 3: Create a new Web Resource (Java Script file) I have used the name "multiselectoptionset".

Step 4: Add the following script in that JS file:
// var_new_optionset >> Provide schema-name for Option Set field
// var_new_optionsetvalue >> Provide schema-name for field which will store the multi selected values for Option Set
// OS >> Provide Option Set field object
// OSV >> Provide text field object which will store the multi selected values for Option Set
//Method to convert an optionset to multi select Option Set
function ConvertToMultiSelect(var_new_optionset, var_new_optionsetvalue, OS, OSV)
{
if( OS != null && OSV != null )
{
OS.style.display = "none";
Xrm.Page.getControl(var_new_optionsetvalue).setVisible(false);
// Create a DIV container
var addDiv = document.createElement("<div style='overflow-y:auto; height:80px; border:1px #6699cc solid; background-color:#ffffff;' />");
OS.parentNode.appendChild(addDiv);
// Initialise checkbox controls
for( var i = 1; i < OS.options.length; i++ )
{
var pOption = OS.options[i];
if( !IsChecked( pOption.text , OS, OSV) )
var addInput = document.createElement("<input type='checkbox' style='border:none; width:25px; align:left;' />" );
else
var addInput = document.createElement("<input type='checkbox' checked='checked' style='border:none; width:25px; align:left;' />" );
var addLabel = document.createElement( "<label />");
addLabel.innerText = pOption.text;
var addBr = document.createElement( "<br/>"); //it's a 'br' flag
OS.nextSibling.appendChild(addInput);
OS.nextSibling.appendChild(addLabel);
OS.nextSibling.appendChild(addBr);
}
}
}
///////Supported functions
// Check if it is selected
function IsChecked( pText , OS, OSV)
{
if(OSV.value != "")
{
var OSVT = OSV.value.split(";");
for( var i = 0; i < OSVT.length; i++ )
{
if( OSVT[i] == pText )
return true;
}
}
return false;
}
// var_new_optionsetvalue >> Provide schema-name for field which will store the multi selected values for Option Set
// OS >> Provide Option Set field object
// Save the selected text, this field can also be used in Advanced Find
function OnSave(OS, var_new_optionsetvalue)
{
var getInput = OS.nextSibling.getElementsByTagName("input");
var result = '';
for( var i = 0; i < getInput.length; i++ )
{
if( getInput[i].checked)
{
result += getInput[i].nextSibling.innerText + ";";
}
}
//save value
control = Xrm.Page.getControl(var_new_optionsetvalue);
attribute = control.getAttribute();
attribute.setValue(result);
}
Step 5: Add "ConvertToMultiSelect()" method on Form OnLoad event:
 Step 6: Add "OnSave()" method on Form OnSave event:
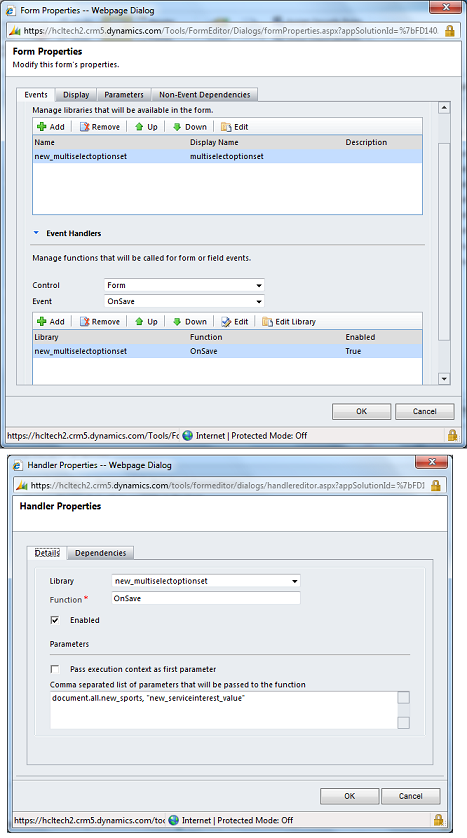
 Step 7: Publish the entity and enjoy........

Just have a look on following steps:
Step 1: Create a new OptionSet field. I have used the name "sports".


Step 4: Add the following script in that JS file:
// var_new_optionset >> Provide schema-name for Option Set field
// var_new_optionsetvalue >> Provide schema-name for field which will store the multi selected values for Option Set
// OS >> Provide Option Set field object
// OSV >> Provide text field object which will store the multi selected values for Option Set
//Method to convert an optionset to multi select Option Set
function ConvertToMultiSelect(var_new_optionset, var_new_optionsetvalue, OS, OSV)
{
if( OS != null && OSV != null )
{
OS.style.display = "none";
Xrm.Page.getControl(var_new_optionsetvalue).setVisible(false);
// Create a DIV container
var addDiv = document.createElement("<div style='overflow-y:auto; height:80px; border:1px #6699cc solid; background-color:#ffffff;' />");
OS.parentNode.appendChild(addDiv);
// Initialise checkbox controls
for( var i = 1; i < OS.options.length; i++ )
{
var pOption = OS.options[i];
if( !IsChecked( pOption.text , OS, OSV) )
var addInput = document.createElement("<input type='checkbox' style='border:none; width:25px; align:left;' />" );
else
var addInput = document.createElement("<input type='checkbox' checked='checked' style='border:none; width:25px; align:left;' />" );
var addLabel = document.createElement( "<label />");
addLabel.innerText = pOption.text;
var addBr = document.createElement( "<br/>"); //it's a 'br' flag
OS.nextSibling.appendChild(addInput);
OS.nextSibling.appendChild(addLabel);
OS.nextSibling.appendChild(addBr);
}
}
}
///////Supported functions
// Check if it is selected
function IsChecked( pText , OS, OSV)
{
if(OSV.value != "")
{
var OSVT = OSV.value.split(";");
for( var i = 0; i < OSVT.length; i++ )
{
if( OSVT[i] == pText )
return true;
}
}
return false;
}
// var_new_optionsetvalue >> Provide schema-name for field which will store the multi selected values for Option Set
// OS >> Provide Option Set field object
// Save the selected text, this field can also be used in Advanced Find
function OnSave(OS, var_new_optionsetvalue)
{
var getInput = OS.nextSibling.getElementsByTagName("input");
var result = '';
for( var i = 0; i < getInput.length; i++ )
{
if( getInput[i].checked)
{
result += getInput[i].nextSibling.innerText + ";";
}
}
//save value
control = Xrm.Page.getControl(var_new_optionsetvalue);
attribute = control.getAttribute();
attribute.setValue(result);
}
Step 5: Add "ConvertToMultiSelect()" method on Form OnLoad event: